How to Make a Kawaii Inspired Planter-Pinterest Pick of the Week!
This post contains Affiliate Links, which means at No Additional Cost to you, I receive a small commission if you purchase through these links. See my Disclosure & Disclaimer Page for more details. I've been a Pinterest fan since 2012-so you can imagine how many amazing projects, recipes, crafts, and ideas I have pinned on my multiple boards. However, I've only taken the time to do a handful of these fabulous ideas and decided it's time to start using this platform and exploring my creative side and enjoying life a bit more, to say the least. I've decided to try to do 1-2 projects a week. I thought this would help me relax and spark some joy too. For my first project, I opted to make a Happy Planter inspired by this Pin. I want to start gardening and planting more flowers, so this was a win-win choice for me. I love pastel colors, so Candy Pink was perfect for my new Kawaii Inspired Happy Planter. Here's what you will need to make your new planter: 
- Plastic Planter
- Rust-Oleum Universal Paint & Primer Paint
- Aleene's Original Acrylic Sealer Gloss Finish
- Black, Dark Pink, and Pastel or Light Pink Sharpies
- Mask (if you are sensitive to fumes)
Step 1—Find an Open Space to Paint
 This is definitely an outdoor project unless you have a ventilated workshop with an area to paint in. Remember when you spray paint, there will be a mist that can coat objects around what you are painting, so be sure to have a clear space to paint. Put down plastic or something you don't mind painting on to catch any overage. Once you have your area prepped, you're ready to paint away.
Step 2—Spray Paint Your Planter
 The Rust-Oleum Universal Spray Paint is fantastic for projects like this one. It's effortless to use at any angle, is fast drying, and prevents rust. It is available in a variety of colors, but remember to choose a lighter tone so your Kawaii Happy Face will show up.It is the primer & paint in one and is excellent for:
- Plastic
- Metal
- Wood
- Masonry
I use short bursts of paint to prevent runs. Two coats should give a nice even tone or maybe three depending on the base color of your planter. Be sure to let the paint dry in between coats. You will not add the gloss coat until after you draw on your happy face.
Step 3—Draw Your Happy Face
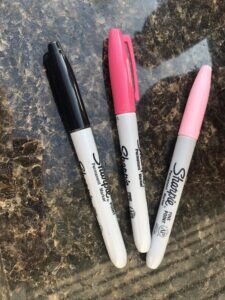 Once your planter is dry, it's time to draw on your happy face. Start with your black sharpie and draw two curved lines for your eyes. Then give her some flair with curved strokes for the eyelashes. I made the mouth small for an adorable Kawaii look. Just draw a small curved line with a curve on each corner, then a small u-shape, and color it in for the mouth. Add blushing cheeks with your dark pink sharpie by drawing a circle on each side and coloring them in. Then take the lighter pink sharpie and add a small highlight circle around it. Feel free to add some black dots for freckles if you want.
Step 4—Gloss Your Planter
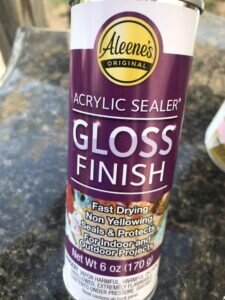 Give it a few minutes for your sharpie marker to set in before glossing it. I chose Aleene's Original Crylic Sealer Gloss Finish. It's for Indoor & Outdoor projects, seals, and dries quickly. Again, I used short bursts to avoid runs. Be sure to let your planter dry completely before handling it.
Step 5—Add Your Favorite Plant or Flower
 Grab some potting soil and fill your planter and then add your favorite plant or flower to your new Happy Planter! I think succulents would be a wonderful choice but do whatever brings you joy. I think I'm going to make a few of these in a variety of pastel colors such as sea green, baby blue, and light yellow. I may even use different expressions to make it even more fun. Check back for my next Pinterest Project for more creative fun!